$142.00
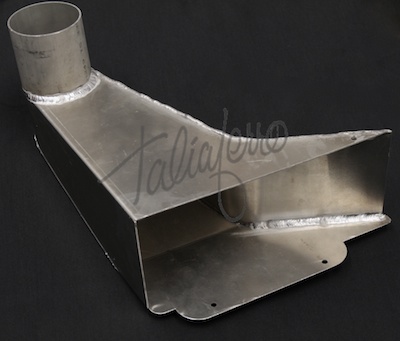
Viggen Fog Air Intake
[RamFOGvig]
Date Added: Monday 10 September, 2012
by James Nakatsu
Not the prettiest of parts that I've ever bought from Taliferro (raw aluminium sheets and pipe welded, markings to indicate where to bend, burrs still intact, etc) but it is CERTAINLY built with care.
It turns out that it uses the foglight mounting "lip" rather than the spoiler lip, so I was able to install this. I found that there was an additional pre-airbox-box (not the OEM box that houses the filter), so I removed it. I can't imagine how the original intake allowed the motor to breathe at all! Now the cone filter gets fresh air directly from this intake. With fall coming up (rapidly), I may later opt to install a mesh to reduce the "solid" debris from entering the intake area.
One thing of note is that the top bolt needs to be a tad longer. From the top, it won't reach the threads to "bite". I'll head to the hardware store to score a longer bolt with a bigger head and perhaps a rubber washer to silence any potential noise (The top bolt will seat itself in a piece of sheetmetal that is in a slight angle).
Some install reviews:
Jack up the car a bit & secure with stands.
Open bonnet.
Remove filter assembly.
Remove the fog light, and wrap the connector (weatherproof).
Zip tie the wire so it won't hang loose.
If you can see the ceiling, you're good to go.
Remove the intermediate airbox (8mm screws x2)
Confirm clear passage to filter.
Insert new duct behind foglight opening, pipe first.
Position duct so that the bottom lip sits atop the foglight bracket.
Pop in the bolts (2) from the front.
From under the car, reach into duct and hold the bolts
Install washer & locknut hand tighten.
[nut/washer/body/duct/bolt head]
From outside you can reach into duct with one hand and reach over to feel for it popping into engine compartment with other.
Once the pipe clears the opening, find the top welded nut.
Place BIG washer over nut, insert bolt (get a longer one), tighten.
Go back and tighten the two lower nuts (10mm)
Smack it with fist, wriggle it, make sure no noises occur.
Put everything back together.
Take it for a drive.
Come back to this site and write review.
Post-install Impressions...
Seemingly bit of improved throttle response (need more data)
What to do with the driver's side foglamp...?
Not the prettiest part, but looking forward to performance
One extra part to watch out for, when removing bumper
This part might double as a turbo-whine-amplifier...!!!
Again, a great product from Taliaferro!
Rating: [5 of 5 Stars!]
It turns out that it uses the foglight mounting "lip" rather than the spoiler lip, so I was able to install this. I found that there was an additional pre-airbox-box (not the OEM box that houses the filter), so I removed it. I can't imagine how the original intake allowed the motor to breathe at all! Now the cone filter gets fresh air directly from this intake. With fall coming up (rapidly), I may later opt to install a mesh to reduce the "solid" debris from entering the intake area.
One thing of note is that the top bolt needs to be a tad longer. From the top, it won't reach the threads to "bite". I'll head to the hardware store to score a longer bolt with a bigger head and perhaps a rubber washer to silence any potential noise (The top bolt will seat itself in a piece of sheetmetal that is in a slight angle).
Some install reviews:
Jack up the car a bit & secure with stands.
Open bonnet.
Remove filter assembly.
Remove the fog light, and wrap the connector (weatherproof).
Zip tie the wire so it won't hang loose.
If you can see the ceiling, you're good to go.
Remove the intermediate airbox (8mm screws x2)
Confirm clear passage to filter.
Insert new duct behind foglight opening, pipe first.
Position duct so that the bottom lip sits atop the foglight bracket.
Pop in the bolts (2) from the front.
From under the car, reach into duct and hold the bolts
Install washer & locknut hand tighten.
[nut/washer/body/duct/bolt head]
From outside you can reach into duct with one hand and reach over to feel for it popping into engine compartment with other.
Once the pipe clears the opening, find the top welded nut.
Place BIG washer over nut, insert bolt (get a longer one), tighten.
Go back and tighten the two lower nuts (10mm)
Smack it with fist, wriggle it, make sure no noises occur.
Put everything back together.
Take it for a drive.
Come back to this site and write review.
Post-install Impressions...
Seemingly bit of improved throttle response (need more data)
What to do with the driver's side foglamp...?
Not the prettiest part, but looking forward to performance
One extra part to watch out for, when removing bumper
This part might double as a turbo-whine-amplifier...!!!
Again, a great product from Taliaferro!
Rating:


